Behind the Scenes: Building the New Visual Annotations by Jonathan

In part 1 of this post we talked about why we needed to redesign the Notable visual annotations, and how we went about framing the problem. Now we'll show how we actually implemented the design, including some cool CSS techniques we picked up along the way.

Creating an Overlay with Layers

The overlays comprise two objects: an overlay with the shine and a border with the transparency.

Our solution was not technically too complex. With Notable (as well as most of our projects) we've embraced the concept of graceful degradation: we take advantage of new CSS techniques that degrade cleanly to older browsers.

Our note overlays are composed of two main elements, an outer border div and an inner overlay div.

The overlay was the easy part. As Notable doesn't currently support IE6 (though it does support 7 and 8) we were able to use a PNG overlay to create the glass shine effect. It stays pinned to the top-left of the div so we don't have to worry about it scaling out to something enormous.

The border div has as its background a 1x1px white PNG, which creates the overlay itself. Combined with the shine overlay we had our glass effect. The border div also has a border-radius applied to it to round the edges in any newer browser. We gave the active state a -box-shadow property so that notes being created or edited would jump off the page.

Fun with border-image

The trickiest piece, and most fun, was actually the gradient on the border. As you can see in the mockups or below in the live code, the notes have a 4px border that fades from bright orange to a darker shade as you go from top to bottom. We didn't want to use a canvas knockout so instead we used border-image, which is a really versatile but slightly tricky CSS property.

The basic gist of border-image is that you can set an image of your choosing as the overlay for the border of an object, but the truth is quite a bit more complicated.

What happens is that the web browser takes your image and divides it into 9 equal section, a 3x3 grid. It then takes the top left section and makes that the top left border corner, then takes the top middle and stretches it across the top border, and so on around the object. What's tricky is it does the same for the center of your image, stretching it across the entire object.

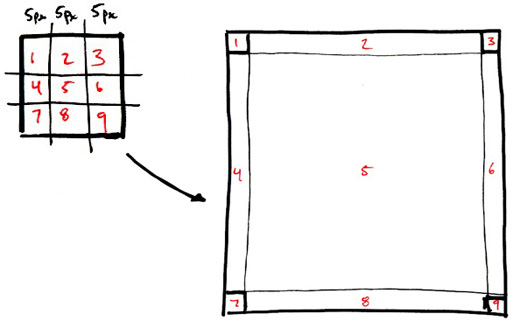
As you can imagine even just like that border-image has some really cool applications for making a complex object out of a fairly simple image file. However we needed to cut out the middle, or it would obscure our glassy overlay. So, we cut it out.

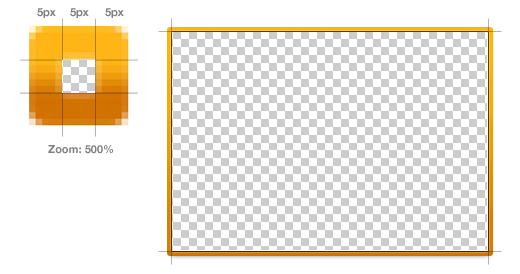
Our border image is created with a 15x15 image with:

  • The middle 5x5 square removed (or completely transparent)
  • The top 5 and and bottom 5 pixels as solid colors (they are such a small part of the overlay they don't need to be a gradient)
  • The left center and right center 5x5px sections contain the actual gradient we stretch across the left and right hand borders.
  1. div.border {
  2. border: 5px solid #feb515;
  3. -moz-border-radius: 3px;
  4. -webkit-border-radius: 3px;
  5. -moz-border-image: url(border-image.png) 5 5 5 5 stretch;
  6. -webkit-border-image: url(border-image.png) 5 5 5 5 stretch;
  7. }

The border-image property only has a few values: image source, width (on all sides) and the method of applying the image.

Awesome, huh? These little lessons in implementation are pretty exciting for us; it's always fun to learn new tools to make awesome stuff happen. You can see our new note style by checking out this public Notable post.

More Behind the Scenes

These short sprints happen all the time at ZURB, not only for Notable but for clients as well. Our process has worked out well for us so far, and we hope you enjoyed this little window into it. We'll keep our eyes peeled for another opportunity to share our process and how we get things done.

15 Comments

  • Mark Steggles says:

    All this new css3 is very cool. Thanks for sharing with us how you are using it in your solutions.

  • Paul Randall says:

    I haven't touched CSS3's border-image before, but this explanation is great and the fact that it is a progressive enhancement is fantastic.

    I will certainly be using it in my next project!

  • willi says:

    hey... nice trick!

    tnx.

  • pete says:

    All the tricks are really nice, but as long as IE 6 has 30% of market share applying them seems to be a bit pointless.

  • cyberfox says:

    Most of those who use IE 6 have tiny screens and not very computer savvy. Why bother about them?

  • Fernando Filho says:

    Amazing man, the best border tutorial of web!

  • Chris Sample says:

    @Pete who cares about that 30% I'm sure most of the people reading articles like this are trying to push the envelope. Not to comply to the bad habits of a small percent of the unenlightened public. That 30% is out-dated is as far as I'm concerned. Therefore not part of the demographic of internet savvy individuals who appreciate techniques like this.

  • Paradox says:

    How do you guys go about creating the rounded numbers? Just a background image? What happens when there are 100+ notes? Did you guys just ignore this?

  • Jonathan (ZURB) says:

    @Paradox Yep! The background is a glyph (we actually have several note colors) and the numbers are center placed on the object. We've yet to encounter someone willing to spend the time needed to add > 100 notes to a capture in Notable, so it was a matter of designing for the overwhelmingly likely use case. We toyed around with using a sliding door effect for the background to accommodate longer numbers, but we have no need for it just yet.

  • Rose says:

    Very cool, I can't wait to try it for my own use.

    Sadly I work at a large company with 6000+ employees and we are still on IE6, not because IT wants to be on IE6 but because we have 1800 custom built applications some that are tied into Safety and operations monitoring that will break when we upgrade. By the way, we all have large screens and most of us are pretty computer savy.

  • Sameer says:

    Amazing....Good Tutorial....and very simple trick but helpful......Thanx

  • Paradox says:

    @Johnathan: Ah, thanks. Was gonna say you could do it using border-radius and padding, or a border image, and box-shadow, but there are difficulties inherit in each method.

  • Ed Gabrielyan says:

    We've been following your blog for quite awhile now, you guys have been a great inspiration! Keep up the awesome job, thanks for the great post!

  • Trend Colours says:

    Hey Nice Idea, we have got new helpful trick...

    Thanx..

  • vio says:

    Hey Nice Idea, we have got new helpful trick.

Add your comment...

Required

Required, but not shared. Nerd's honor.

About the ZURBlog

The ZURBlog is where we discuss design interaction and strategy. We use design thinking to challenge businesses and designers to improve the products and services they create.

What's the ZURBword?

What's the ZURBword?

ZURBword.com is our thoughts on interaction design and strategy. What?

Photos on Flickr

  • 4414442457_f7273ee48b_s
  • 4415209236_3ee49cd530_s
  • 4414440971_1f5c640d96_s
  • 4414439321_8fde28bc5d_s
  • 4414438469_8311a56d16_s
  • 4415205332_38e0a25655_s
  • 4415204866_2e441bcb41_s
  • 4415203878_de626831de_s
  • 4415203204_dbda2d2052_s

Videos on YouTube

Bookmarks on Delicious

Wanna talk? Call us at (408) 341-0600.

Hmm, not a big talker. Email us to .

Still here? Great, we're hiring.

We need people with chops to join our quest
for world domination. Want a job, nerd?

What's the ZURBword?

ZURBword.com is our thoughts on interaction design and strategy. What?

Subscribe to ZURBnews

Get our monthly newsletter, ZURBnews.
Check out last month's edition »